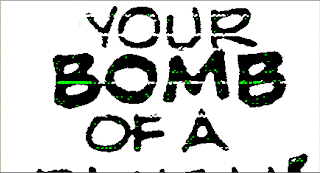
The basic problem we are having with the strips for the second Gordo book is that some of the images (particularly the odd-page numbers, which would be the right-hand side images -- the backs of the pages), were copied on a machine which introduced thin white lines across the images.
If we look at an image, and blow it up we find:
In this small segment of an image, we can see 4 white lines. The green pixels are ones that our programs have identified and marked as being white, but should be black. A lot of the green pixels are just single pixel errors -- general noise -- and not associated with the white lines explicitly.
We have tried for months to write programs that will find just the white lines and fill them in. It seems at first to be relatively simple: look for white pixels with black pixels above and below. But consider the following image segment:
This would seem to be an obvious case of a thin (3 pixel) white line. But if we pull back from this and look at the larger context,
The gap in the previous image is the space between the bottom of one A and the top of the A on the next line. It is not something that should be fixed. Although, it may in fact actually be a 3-pixel white line that just happened to be in exactly that place; it requires judgement to determine if it should be filled in or not.
And there are lots of places in the images where there are a "small" number of white pixels have black above and below, but are not caused by a white line. Consider in the original image we showed above
The space between the top line of the F and the middle line should not be filled in, but meets the simple definition -- a small number of white pixels with black above and below. The letter E is an even worse case.
So after months of trying to program fixing the lines, it seemed that I needed to just do it by hand. On my Linux system, the image editor GIMP provides me the ability to edit images one pixel at a time. So I just need to load each image and then find the little white lines, and change the appropriate white pixels to black.
Of course that would be tedious at best. Pixel by pixel editing is very time consuming. We want to be able to see what we have changed and what was the original image, so we change the pixels from white to green, and then can use a later program to change the green pixels to black. We use a pencil setting to draw green pixels over the white pixels that we want to change.
And to avoid having to change just exactly the right (white) pixels, we developed a process that allows us to draw slightly out of the lines and also change black pixels. A program then compares the modified image with the original image and if it finds a green pixel where there used to be a black pixel, it keeps that pixel black, remembering the green pixel only if the previous pixel was white. This allows us to be a bit sloppy in our editing so we can work faster.
So if we take our example image, we can mark it as:
and then process it down to
We are working on each panel of the book, one at a time. We started this in May, and it looks like we may finish it by November or December.


No comments:
Post a Comment